Sticky adhesive marks, dried glue spills, and stubborn residue can leave your vinyl flooring looking messy and dull. Whether you’re dealing with fresh glue from a DIY project or hardened adhesive left behind after removing old carpet or stickers, knowing how to safely remove glue from vinyl floors is essential to maintaining their appearance and longevity.
At Award Carpets Gold Coast, we understand that vinyl flooring is a practical, low-maintenance choice for busy homes—but even the toughest floors need proper care when accidents happen.
This guide walks you through safe, effective methods for removing glue and adhesive residue without damaging your vinyl’s protective surface, so your floors stay looking sharp for years to come.
Why Glue and Adhesive Residue Build Up on Vinyl Flooring
Common Causes of Glue Marks on Vinyl Floors
Glue marks and adhesive residue on vinyl flooring can come from a variety of sources. Home renovations often involve accidental spills from construction adhesives, flooring glue, or sealants. Sticker and tape residue from labels, protective packaging, or temporary floor markings can leave behind sticky patches that attract dirt and grime. Carpet removal is another common culprit—old carpet adhesive can seep into vinyl seams or leave stubborn patches across the surface. Even everyday items like furniture pads, toy stickers, or double-sided tape can leave behind unwanted residue when removed.
The Difference Between Wet Glue and Hardened Adhesive
Fresh, wet glue is significantly easier to remove than dried adhesive. When glue is still wet, it can often be wiped away with warm soapy water and a soft cloth before it bonds to the vinyl surface. Once adhesive hardens, however, it forms a strong bond that requires more effort and specific techniques to break down. Hardened glue may need gentle scraping, heat application, or chemical solvents to soften and lift without damaging the floor underneath.
Why Vinyl Flooring Requires Gentle Cleaning Methods
Vinyl flooring has a protective wear layer that shields the design layer beneath from scratches, stains, and fading. This wear layer—typically ranging from 0.3mm to 0.5mm on quality residential-grade vinyl—can be easily damaged by abrasive tools, harsh chemicals, or excessive scrubbing. Once the wear layer is compromised, the vinyl becomes vulnerable to discolouration, scuffing, and permanent damage. Gentle cleaning methods are essential to preserve the integrity and appearance of your vinyl floors.
Potential Risks of Using Harsh Chemicals on Vinyl Floors
Strong solvents like acetone, bleach, ammonia, and undiluted paint thinners can strip the protective coating from vinyl flooring, leaving behind dull spots, discolouration, or even warping. Some harsh chemicals can cause the vinyl to become brittle or develop cracks over time. Always use vinyl-safe cleaning products and test any new solution on a hidden area before applying it to visible sections of your floor.
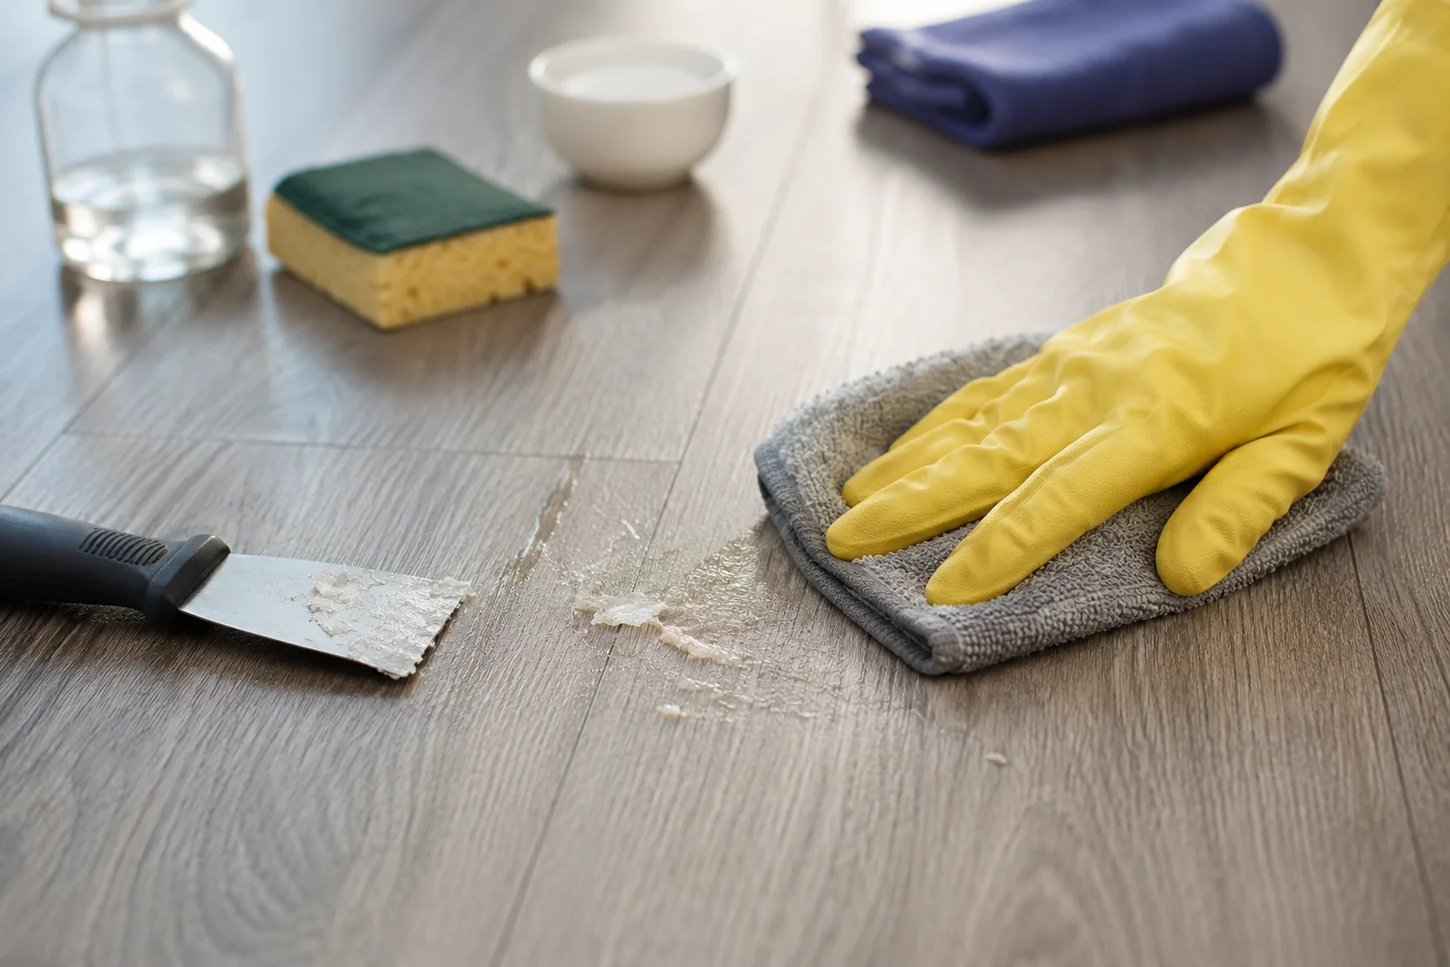
Tools and Supplies Needed for Glue Removal
Plastic Scrapers and Non-Abrasive Tools
A plastic scraper or putty knife is your best tool for lifting hardened adhesive without scratching the vinyl surface. Avoid metal scrapers, which can gouge or leave permanent marks. Plastic paint scrapers, old credit cards, or specialised non-scratch scrapers work well for gently lifting glue without damaging the wear layer.
Soft Cloths, Sponges, and Microfiber Towels
Soft microfiber cloths and non-abrasive sponges are ideal for wiping up wet glue, applying cleaning solutions, and buffing the floor after adhesive removal. Avoid steel wool, scouring pads, or rough brushes that can scratch the surface.
Warm Water and Mild Cleaning Solutions
Warm water mixed with a few drops of dish soap is often all you need for light adhesive removal. This gentle solution helps break down glue without harming the vinyl finish. Keep a bucket of clean water nearby for rinsing and a separate bucket for your cleaning solution.
Rubbing Alcohol and Vinyl-Safe Adhesive Removers
Rubbing alcohol (isopropyl alcohol) is effective at breaking down many types of adhesive without damaging vinyl flooring. Apply it sparingly with a cloth, allowing it to sit on the glue for a few minutes before wiping. Commercial vinyl-safe adhesive removers are also available for tougher jobs—just ensure the product is specifically labelled safe for vinyl surfaces.
Safety Gear and Ventilation Tips
When working with adhesive removers or rubbing alcohol, ensure the room is well-ventilated to avoid inhaling fumes. Open windows and use fans to circulate air. Wear rubber gloves to protect your hands from chemicals and consider safety glasses if you’re scraping hardened glue at eye level.
Preparing Vinyl Flooring Before Removing Glue
Cleaning Dust and Dirt from the Surface
Before tackling adhesive removal, sweep or vacuum the vinyl floor to remove loose dirt, dust, and debris. Cleaning the surface first prevents grit from scratching the floor during the scraping or wiping process.
Identifying the Type of Adhesive on the Floor
Different adhesives require different removal methods. Fresh craft glue or tape residue may lift easily with warm soapy water, while old carpet adhesive or construction-grade glue may need stronger solvents or heat application. Identifying the adhesive type helps you choose the safest and most effective removal technique.
Testing Cleaning Products on a Hidden Area
Always test your chosen cleaning product or solvent on a hidden section of vinyl flooring—such as under furniture or in a corner—before applying it to visible areas. Wait a few minutes to ensure the product doesn’t cause discolouration, dulling, or damage to the finish.
Why Excess Water Should Be Avoided on Vinyl Flooring
While vinyl is water-resistant, excessive water can seep into seams, edges, or damaged areas, potentially causing the adhesive underneath to loosen or the planks to warp. Use damp—not soaking wet—cloths and sponges, and dry the floor thoroughly after cleaning to prevent moisture-related issues.
How to Remove Fresh Glue from Vinyl Flooring
Wiping Up Wet Glue Before It Sets
The best time to remove glue is while it’s still wet. Immediately wipe up spills with a damp cloth or sponge before the adhesive has a chance to bond to the vinyl surface. Work quickly to prevent the glue from spreading or drying.
Using Warm Soapy Water for Light Adhesives
For fresh glue that has just started to set, warm soapy water is usually enough. Mix a few drops of dish soap into warm water, dampen a soft cloth, and gently wipe the affected area. Rinse with clean water and dry thoroughly.
Removing Sticky Residue Without Damaging the Finish
If a sticky film remains after wiping, apply a small amount of rubbing alcohol to a cloth and gently rub the residue in circular motions. The alcohol will help dissolve the adhesive without harming the vinyl’s protective layer.
Properly Drying the Floor After Cleaning
After removing fresh glue, dry the area completely with a clean microfiber towel. Moisture left on vinyl flooring can leave streaks, attract dirt, or seep into seams, so thorough drying is an important final step.
Effective Ways to Remove Hardened Vinyl Floor Adhesive
Softening Dried Adhesive Before Scraping
Hardened glue needs to be softened before it can be safely scraped away. Apply a warm, damp cloth to the adhesive and let it sit for 5-10 minutes to loosen the bond. For stubborn glue, apply rubbing alcohol or a vinyl-safe adhesive remover and allow it to penetrate the dried residue.
Safely Using a Plastic Scraper on Vinyl Flooring
Once the adhesive has softened, use a plastic scraper held at a low angle to gently lift the glue from the vinyl surface. Work slowly and avoid applying excessive pressure that could scratch the wear layer. If the glue resists, apply more solvent and wait longer before scraping again.
Applying Rubbing Alcohol to Break Down Glue
Rubbing alcohol is particularly effective for breaking down dried adhesive. Dampen a cloth with rubbing alcohol, place it over the glue, and let it sit for a few minutes. The alcohol will dissolve the adhesive, making it easier to wipe or scrape away without damaging the vinyl.
Cleaning Remaining Residue Without Leaving Marks
After scraping, there may still be a thin sticky film on the floor. Use a fresh cloth dampened with rubbing alcohol or warm soapy water to wipe away the remaining residue. Buff the area gently to restore the floor’s natural shine.
Final Cleaning Steps After Adhesive Removal
Once all glue is removed, clean the entire section with warm water to remove any cleaning product residue. Dry the floor thoroughly with a microfiber towel to prevent streaking and restore the vinyl’s polished appearance.
DIY Methods for Removing Glue from Vinyl Floors
Dish Soap and Warm Water Method
One of the simplest and safest DIY methods involves mixing a few drops of dish soap into a bucket of warm water. Dampen a soft cloth with the solution and gently rub the glue until it begins to lift. This method works well for light adhesives and fresh spills.
Vinegar Solutions for Mild Glue Residue
White vinegar diluted with water (1:1 ratio) can help break down mild adhesive residue. Apply the solution with a cloth, let it sit for a few minutes, then wipe clean. Using a diluted vinegar solution is best practice to avoid any residue build-up over time.
Using Ice to Harden Sticky Adhesives
For soft, gummy adhesives like chewing gum or craft glue, place ice cubes in a plastic bag and hold them against the glue for a few minutes. The cold will harden the adhesive, making it easier to scrape off with a plastic scraper.
Hair Dryer Techniques for Softening Glue
A hair dryer set to low or medium heat can soften hardened glue without damaging vinyl flooring. Hold the dryer a few inches above the adhesive, moving it slowly back and forth until the glue becomes pliable. Once softened, scrape gently with a plastic tool.
Knowing When DIY Solutions Are Enough
DIY methods work well for small areas of fresh or light adhesive. However, if you’re dealing with large sections of hardened carpet glue, construction adhesive, or if your efforts aren’t making progress, it may be time to consider professional help or commercial vinyl-safe adhesive removers.
How to Remove Super Glue and Strong Bonding Adhesives Safely
Why Heavy-Duty Adhesives Require Extra Care
Super glue, epoxy, and construction adhesives form incredibly strong bonds that can be difficult to break without the right approach. These adhesives require specific solvents or techniques to remove safely, as aggressive scraping or harsh chemicals can easily damage vinyl flooring.
Safe Products to Use on Vinyl Flooring
Rubbing alcohol or vinyl-safe adhesive removers are your best options for tackling super glue on vinyl floors. Apply the product sparingly with a cloth, allowing it to sit on the glue for several minutes to break down the bond before attempting removal.
Avoiding Scratches and Surface Damage
When dealing with strong adhesives, patience is key. Never force a scraper under hardened glue—this can gouge the vinyl surface. Instead, reapply solvent multiple times if needed, allowing each application to soften the adhesive further before gently lifting it away.
What to Do If Glue Will Not Come Off
If super glue or epoxy refuses to budge after multiple attempts, it may be safer to consult a flooring professional rather than risk damaging the vinyl by using abrasive methods or harsh chemicals. In some cases, stubborn adhesive may need specialised commercial-grade removers or professional equipment.
Cleaning Sticker Residue, Tape Adhesive, and Glue Seepage from Vinyl Flooring
Removing Sticky Tape Marks from Vinyl Floors
Double-sided tape, masking tape, and packing tape can leave behind sticky residue that attracts dirt. Apply rubbing alcohol to a cloth and gently rub the tape marks in circular motions. The alcohol will dissolve the adhesive, allowing you to wipe it away cleanly.
How to Lift Sticker Residue Without Discolouration
For sticker or label residue, apply a small amount of rubbing alcohol or a vinyl-safe adhesive remover to the sticky area. Let it sit for a minute, then gently rub with a soft cloth. Avoid scrubbing aggressively, which can dull the vinyl finish.
Cleaning Adhesive Seepage Along Floor Seams
Adhesive seepage along vinyl plank seams is common during flooring installation if excess glue is used. Once the adhesive has dried, apply rubbing alcohol along the seam and carefully scrape with a plastic tool held parallel to the seam line to avoid gouging the planks.
Preventing Residue Build-Up in High-Traffic Areas
High-traffic areas are more prone to accumulating sticky residue from dirt, spills, and foot traffic. Regular sweeping and mopping with a vinyl-safe cleaner helps prevent adhesive build-up and keeps your floors looking fresh in busy hallways, entryways, and kitchens.
Removing Carpet Glue from Vinyl Flooring
Why Carpet Adhesive Can Be Difficult to Remove
Carpet adhesive is designed to create a permanent bond, making it one of the most stubborn types of glue to remove from vinyl flooring. Old carpet glue can harden into a thick, rubbery layer that resists scraping and requires persistent effort to lift.
Best Methods for Loosening Old Carpet Glue
Apply a vinyl-safe adhesive remover or rubbing alcohol generously over the carpet glue and let it sit for 10-15 minutes to soften the bond. Use a plastic scraper to gently lift sections of adhesive, reapplying solvent as needed. For large areas, work in small sections to maintain control and prevent the solvent from drying before you can scrape.
Handling Large Sections of Adhesive Residue
Removing carpet glue from large areas can be time-consuming and physically demanding. Consider renting a floor scraper tool with a plastic blade attachment for bigger jobs, or use a heat gun on low setting to soften the adhesive in manageable sections. Always keep the heat source moving to avoid warping the vinyl.
When Professional Help May Be Necessary
If you’re dealing with extensive carpet adhesive coverage, particularly over large rooms or across multiple planks, professional flooring specialists have the tools and expertise to remove the glue safely without damaging your vinyl floors. This is especially important if the adhesive has been in place for many years or if your DIY efforts aren’t making progress.
Commercial Adhesive Removers for Vinyl Flooring
Choosing Vinyl-Safe Cleaning Products
Not all adhesive removers are safe for vinyl flooring. Look for products specifically labelled “vinyl-safe” or “LVT-safe” (luxury vinyl tile). These formulas are designed to break down glue without damaging the protective wear layer or causing discolouration.
Products That Should Be Avoided on Vinyl Floors
Avoid acetone, acetone-based nail polish removers, undiluted paint thinners, bleach, ammonia-based cleaners, and abrasive scouring powders. These harsh chemicals can strip the vinyl’s finish, cause fading, or create permanent damage to the surface.
How to Use Adhesive Removers Correctly
Always follow the manufacturer’s instructions when using commercial adhesive removers. Typically, you’ll apply a small amount to the affected area, allow it to sit for the recommended time (usually 5-10 minutes), then wipe or scrape away the softened glue. Rinse the area with clean water afterwards to remove any chemical residue.
Protecting the Protective Wear Layer of Vinyl Flooring
The wear layer is your vinyl floor’s first line of defence against scratches, stains, and fading. When using adhesive removers, avoid over-saturating the floor or leaving chemicals on the surface longer than necessary. Wipe up the product promptly and rinse thoroughly to preserve the integrity of the wear layer.
Common Mistakes to Avoid When Removing Glue
Using Metal Scrapers or Abrasive Brushes
Metal scrapers, wire brushes, and steel wool can easily scratch and gouge vinyl flooring, leaving permanent marks in the protective wear layer. Always use plastic scrapers, soft cloths, and non-abrasive tools when removing adhesive.
Applying Excessive Heat to Vinyl Flooring
While gentle heat from a hair dryer can soften glue, excessive heat from heat guns or steam cleaners set too high can warp, bubble, or discolour vinyl flooring. Keep heat sources at a safe distance and use low settings to avoid damage.
Over-Saturating the Floor with Water
Pouring water directly onto vinyl floors or using soaking wet mops can cause moisture to seep into seams, edges, or beneath planks, potentially loosening the underlying adhesive or causing warping. Use damp cloths and controlled amounts of water during cleaning.
Scrubbing Too Aggressively
Vigorous scrubbing can dull the vinyl finish, remove the protective coating, or create visible scratches. Use gentle, circular motions and let cleaning solutions do the work of breaking down adhesive rather than relying on brute force.
Ignoring Manufacturer Cleaning Recommendations
Every vinyl flooring product comes with specific care and cleaning guidelines from the manufacturer. Ignoring these recommendations can void warranties or lead to accidental damage. Check your flooring documentation before attempting adhesive removal.
How to Protect Vinyl Flooring During DIY Projects
Preventing Glue Spills During Renovations
When undertaking DIY projects that involve adhesives, glue, or sealants, lay down protective coverings over your vinyl flooring before you start. Drop cloths, plastic sheeting, or cardboard can catch spills and prevent damage.
Using Protective Floor Coverings
During painting, construction, or renovation work, protect your vinyl floors with heavy-duty floor protection film or thick cardboard. Secure the edges with low-tack painter’s tape that won’t leave residue when removed.
Cleaning Adhesive Spills Immediately
If glue or adhesive does spill onto your vinyl flooring, clean it up immediately while it’s still wet. Fresh spills are exponentially easier to remove than dried adhesive and prevent long-term staining or bonding.
Safe Practices for Painting and Construction Work
Keep glue bottles, paint cans, and adhesive containers closed when not in use. Use trays and containers to catch drips, and keep damp cloths nearby for quick clean-up. These simple precautions can save hours of scrubbing later.
Caring for Vinyl Flooring After Glue Removal
Restoring Shine After Cleaning
After removing adhesive, your vinyl floor may look dull or streaky. Restore its shine by cleaning the area with a vinyl floor cleaner and buffing with a clean microfiber cloth. This removes any remaining chemical residue and brings back the floor’s natural lustre.
Safe Maintenance Products for Vinyl Floors
Use pH-neutral vinyl floor cleaners for routine maintenance. Avoid wax-based products, oil soaps, or polishes that can leave a sticky residue or dull the finish over time. Regular sweeping and damp mopping with a vinyl-safe cleaner will keep your floors looking sharp.
Preventing Future Adhesive Build-Up
Place protective pads under furniture legs, use area rugs in high-traffic zones, and clean up spills immediately to prevent adhesive residue from accumulating on your vinyl flooring. Regular maintenance reduces the need for intensive cleaning down the track.
Routine Cleaning Tips for Long-Term Floor Protection
Sweep or vacuum your vinyl floors regularly to remove dirt and grit that can scratch the surface. Damp mop weekly with a vinyl-safe cleaner, and address spills and stains as soon as they occur to maintain the floor’s appearance and durability.
Signs It’s Time to Contact a Flooring Professional
Large Areas of Hardened Adhesive
If you’re facing extensive sections of hardened carpet glue, construction adhesive, or other stubborn residue across multiple rooms, professional flooring specialists have commercial-grade tools and solvents that can remove adhesive more efficiently without risking damage to your vinyl.
Lifting, Bubbling, or Damaged Vinyl Flooring
If adhesive removal attempts have caused your vinyl planks to lift, bubble, or show visible damage, it’s time to call in a professional. Attempting to fix these issues yourself can make the problem worse and may require plank replacement.
Persistent Sticky Residue That Will Not Lift
When DIY methods and commercial adhesive removers fail to budge stubborn glue, professional flooring technicians can assess the situation and use specialised equipment or techniques to safely remove the residue without compromising your floor.
Concerns About Permanent Surface Damage
If you’re unsure about the safety of a cleaning method or worried about causing permanent damage to your vinyl flooring, consult a professional before proceeding. It’s better to seek expert advice than risk ruining your floors with the wrong approach.
Why Quality Vinyl Flooring Makes Maintenance Easier
Benefits of Durable Modern Vinyl Flooring
Today’s vinyl flooring options feature advanced wear layers, scratch-resistant surfaces, and stain-resistant coatings that make them easier to clean and maintain than older vinyl products. Quality vinyl can handle everyday spills, adhesive accidents, and heavy foot traffic without showing signs of wear.
Choosing Easy-to-Maintain Vinyl Flooring Options
When selecting vinyl flooring for your home, consider products with thicker wear layers (0.3mm for standard residential, 0.5mm or higher for premium durability) that offer better protection against scratches, stains, and adhesive damage. Durable vinyl is a smart investment that simplifies maintenance and extends the life of your floors.
Expert Flooring Advice for Gold Coast Homes
Here on the Gold Coast, vinyl flooring needs to stand up to sandy feet, humidity, and active lifestyles. Choosing the right product and knowing how to care for it properly ensures your floors stay looking sharp year after year. Whether you’re installing vinyl in a living room, home office, or high-traffic hallway, quality vinyl is a practical choice that delivers long-lasting value.
Soft Sell — Explore Vinyl Flooring Solutions from Award Carpets Gold Coast
If you’re considering new vinyl flooring or need expert advice on maintaining your existing floors, Award Carpets Gold Coast is here to help. As an independent family-run business with over 30 years of experience, we stock leading Australian brands and unique boutique lines you won’t find anywhere else. From helping you choose the right vinyl flooring to delivering expert installation, our team makes the process simple and stress-free.
Keeping Your Vinyl Floors Looking Sharp After Glue Removal
Removing glue from vinyl flooring doesn’t have to be a stressful ordeal. With the right tools, gentle techniques, and a bit of patience, you can lift adhesive residue without damaging your floors. Whether you’re dealing with fresh spills, dried tape marks, or stubborn carpet glue, taking a cautious approach protects your vinyl’s protective wear layer and keeps your floors looking polished.
Regular maintenance, prompt spill clean-up, and using vinyl-safe products will help prevent adhesive build-up and keep your floors in top condition for years to come. And if you ever face a challenging glue removal situation, don’t hesitate to reach out to the experts at Award Carpets Gold Coast for advice or professional assistance.
Your vinyl floors are tough enough to handle real life—but they deserve gentle care when accidents happen. With the right approach, you can tackle glue removal confidently and keep your Gold Coast home looking sharp.


