Concrete subfloors are one of the most common surfaces in Gold Coast homes — found in ground-level living areas, garages converted into rooms, and open-plan spaces throughout newer builds. The good news is that luxury vinyl plank flooring is one of the most compatible flooring options for concrete. But compatibility doesn’t mean you can just roll out the planks and call it a day.
Concrete needs to be properly assessed and prepared before any installation begins. Get that right, and LVP on concrete is a smooth, durable, and genuinely good-looking result. Skip steps, and you’ll be looking at warped planks, adhesive failures, or moisture damage down the track.
This guide covers everything you need to know — from understanding the product to subfloor preparation, step-by-step installation, and long-term care — with Gold Coast conditions in mind.
What Is Luxury Vinyl Plank Flooring?
Understanding LVP Flooring
Luxury vinyl plank (LVP) is a multi-layer synthetic flooring product engineered to replicate the look and feel of natural timber. Unlike standard vinyl sheet or tile, LVP uses high-definition photographic layers and embossed textures to create a realistic timber aesthetic that holds up well to everyday use.
The core layers typically include a rigid or semi-rigid base (often stone plastic composite or wood plastic composite), a printed design layer, and a clear wear layer on top that protects against scratches, stains, and surface damage. It’s a fundamentally different product from the vinyl sheet flooring of previous decades — in looks, performance, and installation.
Why Homeowners Choose LVP
There are practical reasons LVP has become one of the most popular flooring choices in Australian homes:
- It delivers a convincing timber appearance without the cost or maintenance of real hardwood
- The wear layer resists scratches from furniture, pets, and foot traffic
- Most LVP products are fully waterproof or highly water-resistant, making them suitable for kitchens and bathrooms
- It’s a solid choice for busy households, including families with young children
- It works well as a pet-friendly flooring solution that handles claws and the occasional accident
Types of Luxury Vinyl Plank Flooring
Not all LVP installs the same way. Understanding the type you’re working with affects your installation method on concrete.
Click-Lock Floating Vinyl Planks
Click-lock planks connect to each other via interlocking edges and sit over the subfloor without being fixed down. They’re the most common format for residential installs over concrete and are generally the easiest for DIYers to work with. The floating installation method means the floor can expand and contract slightly with temperature changes — which is important in Queensland’s climate.
Glue-Down Vinyl Planks
Glue-down LVP is adhered directly to the concrete subfloor using a pressure-sensitive adhesive. It’s typically thinner than click-lock and sits very low to the ground, making it a good option for commercial spaces or areas where height transitions matter. It requires a very clean and flat concrete surface, and installation is less forgiving than floating formats.
Loose-Lay Vinyl Planks
Loose-lay planks are held in place by friction and their own weight rather than adhesive or locking systems. They’re quick to install and easy to remove, but they require a particularly smooth and level subfloor. Minor surface irregularities that might be acceptable under a click-lock floor can cause loose-lay planks to shift or show movement.
Can You Install Luxury Vinyl Plank Directly on Concrete?
The Short Answer
Yes — but only if the concrete is properly prepared. Concrete that’s clean, dry, level, and structurally sound is a perfectly capable base for LVP. The challenge is that concrete subfloors rarely meet all those conditions without some work.
Conditions Concrete Must Meet
| Condition | Why It Matters |
| Clean | Dust, debris, grease, and old adhesive residue can prevent proper adhesion or affect plank stability |
| Dry | Moisture is the number one cause of LVP failure on concrete — it leads to mould, lifting, and adhesive breakdown |
| Level | LVP planks require a flat surface within specified tolerances — high and low spots cause movement, squeaking, and premature wear at joints |
| Structurally sound | Crumbling, spalling, or deeply cracked concrete needs to be repaired before flooring is installed |
Common Problems With Concrete Subfloors
Excess Moisture: Moisture rising through concrete — whether from groundwater, condensation, or inadequate drainage — is the most frequent cause of flooring problems. It can cause LVP planks to lift and buckle, promote mould growth under the floor, and break down adhesive bonds. Moisture testing is non-negotiable before installation.
Uneven Surfaces: Concrete slabs are rarely perfectly flat. High spots create pressure points that cause planks to flex and crack at joints, while low spots leave planks unsupported, causing bounce, movement, and noise underfoot.
Cracks and Surface Damage: Hairline cracks less than 3mm wide are generally acceptable and can be filled. Cracks wider than 3mm, active cracks (still moving), or large areas of spalling or deterioration require professional assessment or repair before any flooring goes down.
Assessing Your Concrete Subfloor Before Installation
A proper subfloor assessment takes less time than you might think, but it’s the step that most directly determines whether your LVP installation succeeds long-term.
Step 1: Check for Moisture
There are three common testing methods:
- Plastic sheet test: Tape a 600mm x 600mm sheet of clear plastic to the concrete, seal all edges, and leave it for 24–72 hours. Condensation or water droplets under the sheet indicate moisture movement through the slab.
- Moisture meter: A professional-grade pin or pinless moisture meter gives a faster reading and works well for checking multiple areas of the room.
- Calcium chloride test: The most precise method. A measured quantity of calcium chloride is sealed under a dome on the concrete surface for 60–72 hours, then weighed to calculate the moisture vapour emission rate (MVER). Most LVP manufacturers specify a maximum MVER — check the product documentation.
Step 2: Inspect Surface Flatness
The industry standard for most LVP installations is no more than 3mm variation over a 1.8m straight edge. Use a long spirit level or straight edge across multiple points of the room to identify high spots and low spots. Mark problem areas with chalk.
Step 3: Look for Existing Damage
Check for:
- Cracks — note width, length, and whether they appear active
- Holes or pitted areas
- Spalling (surface flaking or breaking away)
- Previous adhesive residue from carpet, tiles, or old vinyl
Step 4: Evaluate Room Conditions
LVP requires stable temperature and humidity conditions during and after installation. Most products specify installation at temperatures between 15°C and 30°C. In Gold Coast homes, this is rarely a problem — but garages, outdoor entertaining areas, and rooms with poor ventilation may need attention. Check the product specifications for acclimation requirements, as some LVP products need to be left in the room for 24–48 hours before installation.
Tools and Materials Needed
Essential Tools
- Tape measure
- Utility knife with spare blades
- Straight edge or T-square
- Rubber mallet
- Pull bar (for closing joints along walls)
- Spacers (for maintaining expansion gaps)
- Chalk line
- Spirit level or long straight edge
- Jigsaw or circular saw (for complex cuts)
- Kneepads
Materials
- Luxury vinyl planks — always order 10–15% extra to account for cuts and wastage
- Underlay with integrated vapour barrier (if planks don’t have attached underlay)
- Separate moisture barrier film (if additional protection is required)
- Self-levelling compound (for low spots)
- Concrete patching compound (for cracks and holes)
- Transition strips (for doorways and room boundaries)
- Waterproof PVC or timber scotia to cover expansion gaps along walls
Preparing Concrete for Luxury Vinyl Plank Installation
Subfloor preparation isn’t glamorous, but it’s the most important part of the job. The quality of your preparation directly determines the longevity of your floor.
Thoroughly Clean the Surface
Start by sweeping and vacuuming the entire area. Remove any loose debris, sand, or dust. If there’s grease, oil, or chemical contamination — common in garages or older kitchen areas — use a concrete degreaser and allow it to dry completely. Any adhesive residue from previous flooring needs to be scraped or ground back, as it will create high spots that affect plank performance.
Repair Cracks and Holes
Use a suitable concrete patching compound to fill hairline cracks and pitted areas. For cracks up to 3mm wide, a standard concrete repair filler will do the job — apply it, smooth it flush with the surrounding surface, and allow it to cure fully before moving on. For larger or active cracks, consult a building professional. Patching over structural movement won’t hold.
Level the Floor
Self-levelling compound is the standard solution for low spots and uneven areas. It’s poured onto the concrete, spread to the required depth, and flows to find its own level. Always follow the manufacturer’s specifications for mixing ratio and maximum depth per pour — most compounds require a primer coat on the concrete first. Allow full cure time before proceeding.
Grinding high spots requires a concrete grinder. It’s noisier and messier than applying levelling compound, but it’s the correct approach for high points. Avoid the temptation to skim over a high spot with levelling compound — it won’t stay.
Install a Moisture Barrier
In Gold Coast homes — particularly in ground-level slabs, areas close to the waterfront, or anywhere with a history of moisture — a vapour barrier is worth the extra step. A 200-micron polyethylene film laid over the concrete before installation provides a physical barrier against moisture vapour transmission. Overlap seams by at least 300mm and tape them, and run the film up the walls slightly before trimming after skirting boards are installed.
Choosing the Right Underlay for Concrete Subfloors
Do Vinyl Planks Need Underlay?
It depends on the product. Many rigid-core LVP products come with an attached underlay pre-bonded to the back of each plank. If your planks have attached underlay, don’t add a separate underlay layer — it affects the locking system and can cause joint failure. Always check the product specifications.
If your planks don’t have attached underlay, a separate underlay layer is generally recommended for installation over concrete.
Benefits of Underlay
- Reduces impact noise and sound transmission
- Adds underfoot comfort, particularly over hard concrete
- Provides mild thermal insulation
- Helps accommodate very minor subfloor imperfections (not a substitute for proper levelling)
Moisture Protection Considerations
If a 200-micron polyethylene moisture barrier has already been installed directly on the concrete, the underlay on top does not strictly need built-in vapour barrier properties. However, the most important consideration when selecting underlay for LVP is density and thickness. LVP underlay must be high-density and thin — typically 1mm to 1.5mm. Using standard thick or soft underlay causes the floor to deflect under foot traffic, which breaks the click-lock joints over time. Only use underlay that is specifically approved by the LVP manufacturer for use with their product.
Step-by-Step Guide to Installing Luxury Vinyl Plank on Concrete
Step 1: Acclimate the Flooring
Leave the unopened boxes of LVP flat in the room where they’ll be installed for the period specified by the manufacturer — typically 24–48 hours. This allows the planks to adjust to the temperature and humidity of the space before installation, reducing the risk of post-installation expansion or contraction.
Step 2: Plan Your Layout
Measure the room carefully and calculate your starting position. The goal is to avoid narrow strips at the walls — ideally, the first and last rows should be roughly the same width. If the maths doesn’t work out evenly, adjust your starting position so you’re not cutting planks down to a sliver on either side.
Note the direction of natural light and consider installing planks parallel to the longest wall or in the direction light travels through the room, as this tends to give the most visually balanced result.
Step 3: Mark Reference Lines
Snap a chalk line parallel to your starting wall, offset by the width of your first row plus the expansion gap. This gives you a straight reference line to work from — crucial in rooms where walls aren’t perfectly square.
Step 4: Install the First Row
Place spacers (typically 8–10mm) along the starting wall to maintain the expansion gap. LVP is not a fixed floor — it needs room to expand with temperature changes. Without expansion gaps, the floor can buckle during warmer months.
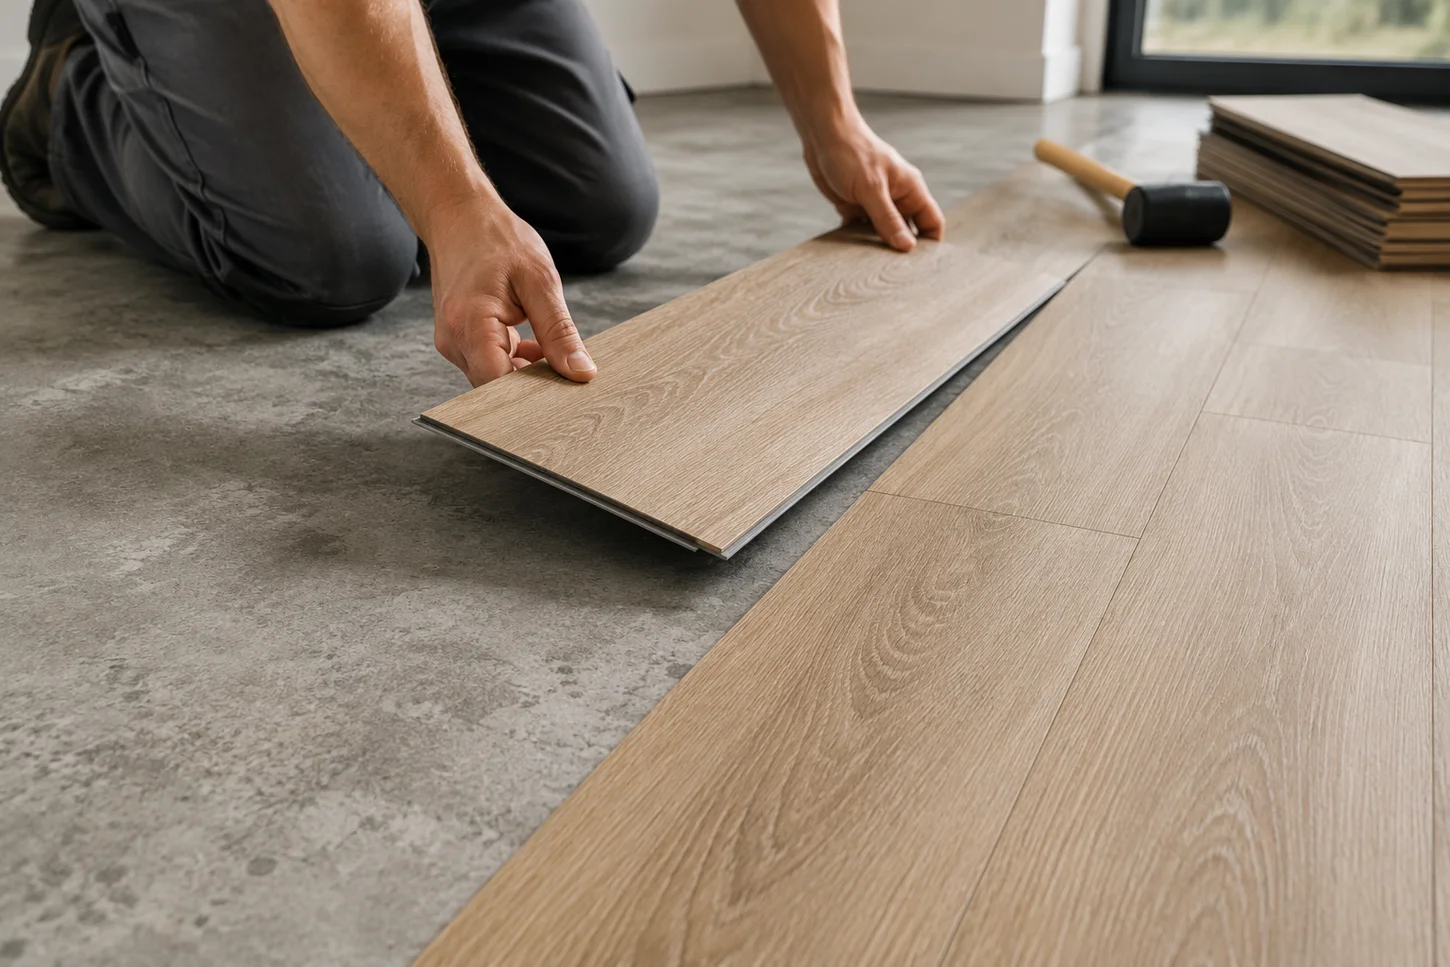
Install the first plank with the tongue side facing the wall. Connect subsequent planks along the same row by angling and pressing them together until the click-lock engages cleanly.
Step 5: Continue Installing Rows
Stagger the end joints between rows by at least 300mm — a 12-inch stagger is the standard minimum, with a one-third or random stagger pattern giving the most natural look. Use off-cuts from the end of one row to start the next, keeping waste to a minimum.
For click-lock systems, engage the long-side joint first by angling the plank into the previous row, then tap the short-side joint closed with a rubber mallet and pull bar. Don’t force joints — if there’s resistance, check that the previous row is properly seated and that there’s no debris in the joint.
Step 6: Cut Planks Around Obstacles
Use a jigsaw for curved cuts around pipes and irregular shapes. For straight cuts around door frames and cabinetry, a utility knife scored multiple times against a straight edge works well for most LVP products. Undercut door frames using a handsaw held flat against a scrap piece of plank — this allows the floor to slide under the frame rather than butting up against it.
Step 7: Install the Final Row
Measure the remaining gap carefully and rip the final row of planks to width, remembering to account for the expansion gap at the wall. A pull bar is essential for tapping the final row into position without being able to swing a mallet freely.
Step 8: Install Finishing Trims
Install waterproof PVC or timber scotia along the base of walls to cover the expansion gap while allowing the floor to move freely. Scotia sits against the wall, not pinned to the floor. At doorways, use T-moulding or other appropriate transition strips to transition cleanly between rooms or different floor heights.
Common Mistakes to Avoid
The most common LVP installation failures are preventable. The common mistakes when installing vinyl planks often come down to a handful of recurring issues:
- Ignoring moisture testing: This is the single most common cause of LVP failure on concrete. Moisture that wasn’t detected pre-installation can cause planks to lift, mould to develop, and adhesives to break down — often months after the floor was laid.
- Installing over uneven concrete: High and low spots cause joint stress, premature wear, and an uneven surface that’s noticeable underfoot. Self-levelling compound and grinding are not optional extras.
- Skipping expansion gaps: Planks installed tight to walls or fixed objects have nowhere to go when the floor expands with heat. The result is buckling or lifting — often in the middle of the room.
- Using the wrong underlay: Adding thick or soft carpet-style underlay will cause the locking joints to break under foot traffic. Only use high-density, manufacturer-approved LVP underlay.
- Failing to acclimate the flooring: Planks installed cold in a warm room can expand and push joints apart. Planks installed warm in a cool room can contract and leave gaps.
- Rushing subfloor preparation: Every hour spent on subfloor prep pays back multiple times over in the life of the floor. Preparation is what determines success.
How Long Does Installation Take?
| Scenario | Typical Timeframe |
| Subfloor preparation (standard) | Half day to full day, depending on repairs needed |
| DIY installation — single room (up to 20m²) | Full day |
| DIY installation — open plan or large area (40m²+) | 2–3 days |
| Professional installation — standard home | 1–2 days including prep |
| Moisture curing (self-levelling compound) | 24 hours minimum before flooring goes down |
These are rough guides. Complex rooms with lots of obstacles, extensive subfloor repairs, or large areas will all extend the timeline. Factor in the curing time for any patching or levelling compounds before scheduling installation day.
Should You DIY or Hire a Professional?
There’s no single right answer, but here’s an honest breakdown. If you’re considering flooring installation on the Gold Coast, weigh these factors:
Benefits of DIY Installation
- Lower overall cost if you already have the tools
- Flexible scheduling — you work at your own pace
- Satisfying result if you’re methodical and patient
Benefits of Professional Installation
- Significantly faster completion
- Proper moisture management from experience and professional testing equipment
- Compliance with manufacturer warranty requirements (many require professional installation for warranty coverage)
- Cleaner result around complex obstacles, doorways, and transitions
- Experienced eye for subfloor issues that might not be obvious to a homeowner
When Professional Installation Is Recommended
- Large open-plan areas over 40m²
- Concrete slabs with identified moisture issues
- Older homes where the slab condition is unknown
- Commercial properties
- When the floor is going into a high-value or investment property where finish quality matters
Caring for Luxury Vinyl Plank Flooring After Installation
Immediate Aftercare
Keep foot traffic light for the first 24 hours to allow the floor to settle. Wait at least 24 hours before moving furniture back in, and use furniture pads under every leg. Heavy items like fridges and washing machines should be rolled in on protective sheeting — don’t drag them across a new floor.
Regular Maintenance
LVP on concrete is genuinely low-maintenance. Regular care involves:
- Sweeping or vacuuming to remove grit and sand (the most common cause of surface scratching)
- Damp mopping with a well-wrung mop and a pH-neutral hard floor cleaner
- Avoiding steam mops — the heat and moisture can damage the wear layer and penetrate joints
Preventing Damage
- Fit felt pads under furniture legs and replace them as they wear
- Use entry mats at external doors to capture sand and debris before it reaches the floor
- Trim pet claws regularly to reduce scratching
- Use curtains or UV-blocking window film in rooms with strong direct sunlight to reduce colour fading over time
Why Luxury Vinyl Plank Works Well in Gold Coast Homes
Gold Coast homes face conditions that affect flooring performance more than many people expect. High ambient humidity, proximity to saltwater in coastal suburbs, sandy feet, and the temperature swings between summer and cooler months all put flooring materials under stress.
LVP handles these conditions well. It’s dimensionally stable enough to deal with Queensland temperature variation, waterproof enough to handle the occasional wet floor, and scratch-resistant enough to cope with the real-life traffic most households produce. It also doesn’t harbour dust mites or allergens the way carpet can — which is a genuine benefit in the humid Gold Coast climate.
Suitable Rooms for LVP on Concrete
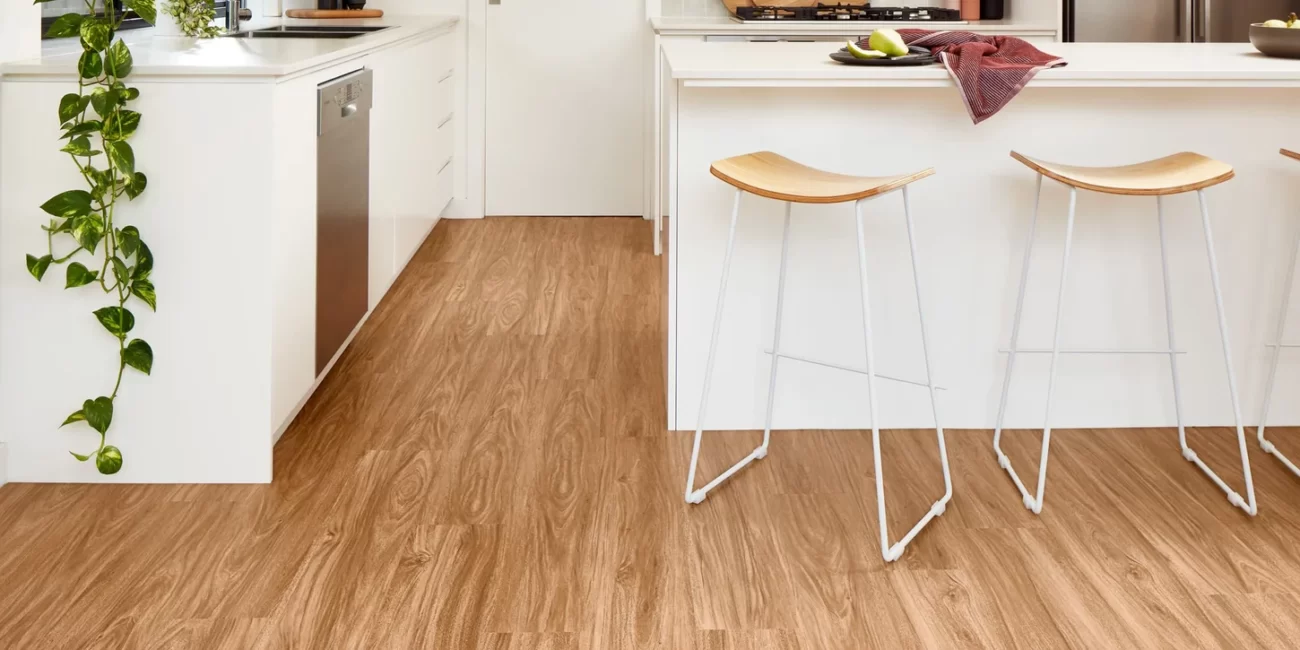
On concrete subfloors specifically, LVP performs well across a range of spaces. As a living room flooring option, it offers a warm, natural look underfoot. In bedrooms, it provides comfort and easy cleaning. As a kitchen flooring option, its waterproof properties handle splashes and spills. It also works well in apartments with slab construction and in investment properties where durability and ease of maintenance matter.
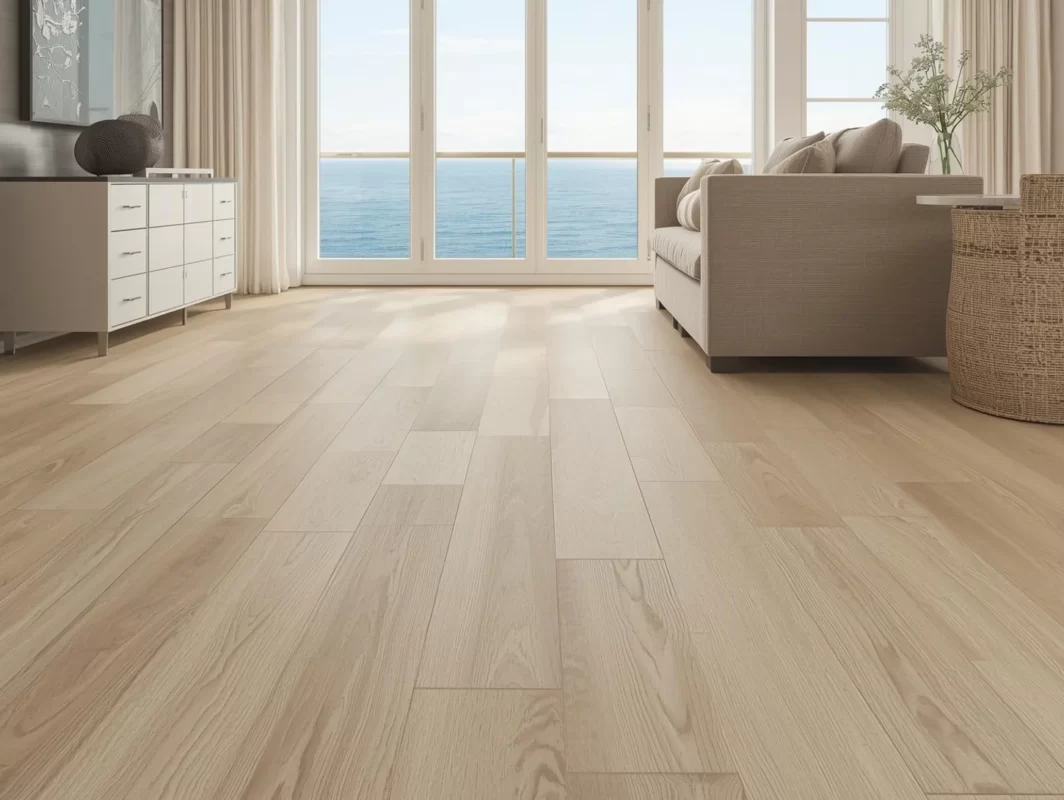
Achieving a Premium Timber Look Without the Cost
One of the practical advantages of LVP is the aesthetic. Modern embossing technology and high-resolution print layers have made the gap between LVP and genuine hardwood difficult to distinguish in everyday conditions. For Gold Coast properties where the coastal lifestyle means real timber is at constant risk from moisture and humidity, LVP often makes more sense as a long-term investment.
Choosing Quality Luxury Vinyl Plank Flooring
What to Look For
| Feature | What It Means for Performance |
| Wear layer thickness | 0.3mm is suitable for standard residential use; 0.5mm is premium residential/light commercial; 0.7mm+ is heavy commercial |
| Waterproof rating | Look for products rated fully waterproof, not just water-resistant — especially important for concrete subfloors where moisture can be a factor |
| Core type | SPC (stone plastic composite) is denser and more rigid, providing superior indentation resistance and dimensional stability in high-temperature areas. However, it still requires a perfectly level subfloor to protect the locking joints. WPC (wood plastic composite) is slightly softer underfoot. |
| Warranty coverage | Check what’s covered and whether it requires professional installation for the warranty to apply |
| Installation system | Quality click-lock systems engage firmly and don’t flex or pop when walking — test samples in-store if possible |
Selecting the Right Colour and Style
Australian interiors tend to lean toward warm, natural timber tones — light oak, coastal grey-brown, and bleached blonde timbers are consistently popular in Gold Coast homes. Lighter shades can make smaller rooms feel more open, while mid-tones hide everyday marks and scratches more effectively. Wide planks (200mm+) tend to give a more contemporary, spacious look; narrower planks suit period or traditional interiors.
Low-VOC and Sustainable Options
If indoor air quality matters to your household, it’s worth looking at low-VOC vinyl flooring options. Low-VOC products emit fewer volatile organic compounds during and after installation — relevant for families with young children, people with respiratory sensitivities, or those looking for a healthier home environment.
Get the Right Advice Before You Start — Talk to Award Carpets Gold Coast
At Award Carpets Gold Coast, we’ve been supplying and installing flooring across the Gold Coast for over 30 years. We know the conditions Gold Coast homes deal with — the humidity, the sandy lifestyle, the coastal climate — and we stock vinyl flooring ranges suited to those conditions.
If you’re planning an LVP installation on concrete, the best first step is talking to someone who knows the product range and the local conditions. We can help you choose the right plank for your subfloor situation, advise on underlay and moisture barriers, and provide professional flooring installation on the Gold Coast if you’d rather hand the job to experienced installers.
Visit us in store, browse online, or give us a call to book a free quote. We’ll make sure you start the project with the right information.